
How to Develop WordPress Website Builds in Twelve Steps
- Twelve real steps from domain purchase to post-launch monitoring.
- Budget 40 to 80 hours for a DIY small business build.
- Copy first, design second. That order cuts the timeline by two weeks.
- JIDA Wythe County hit 100th percentile pagespeed on a WordPress rebuild.
- Monthly monitoring or the site silently degrades over 12 months.
- Twelve steps that answer how to develop wordpress website builds
- Domain, DNS, and hosting for the WordPress website development tutorial baseline
- Theme picks when developing a website using WordPress
- Plugin baseline for how to develop website in WordPress
- Custom blocks and page templates in the WordPress website development course path
- Content input step in learn WordPress website development
- Case study on developing a WordPress website for a real client
- SEO baseline in a WordPress website development tutorial
- Pre-launch checklist in how to develop wordpress website end to end
- Post-launch monitoring in the how to develop wordpress website workflow
- Where to start with your own WordPress build
How to develop wordpress website builds in 2026 is a question that used to have 400 conflicting tutorials answering it and now has 4,000. Half the tutorials tell you to install Elementor. The other half tell you to write a custom theme in React from scratch. Both are wrong for a business site. You need a middle path that takes about 40 hours of your time or 8 weeks of a vendor’s time, ships a site that ranks and converts, and does not lock you into a platform decision you regret in year two.
This guide is how to develop wordpress website builds the honest way in 2026. You get twelve real steps from domain purchase through post-launch monitoring, hosting picks that fit real budgets, theme and block choices that stay portable, an SEO baseline the theme should ship with, a Joint Industrial Development Authority case study on a government rebuild, and the pre-launch checklist that catches mistakes before the whole internet sees them. Read straight through in about fifteen minutes.

Twelve steps that answer how to develop wordpress website builds
How to develop wordpress website builds breaks into twelve real steps that each need a full session of your attention. Domain purchase and DNS setup. Hosting selection and staging environment. WordPress core install and initial configuration. Theme selection or custom theme scaffolding. Plugin baseline install. Custom block or page template development. Content input and copy pass. SEO baseline configuration. Image optimization and CDN setup. Accessibility and cross-browser QA. Pre-launch checklist and DNS switch. Post-launch monitoring and iteration. Skip any one of them and the launch either misses the timeline or ships with a hole you fix in production.
The wrong way to develop a website in WordPress is to install a multipurpose theme, install 40 plugins, dump copy into the homepage in one afternoon, and hit publish. That path produces the sites you see when Google shows you a 2019 result on a mobile search that takes eight seconds to load and does not answer your query. You do not want that site. Your visitors do not want that site. The twelve steps below add up to a site that answers real queries, loads fast on mobile, and keeps earning traffic in year three when most 2019 sites have already been rebuilt at higher cost.
Realistic time budget for each step
A DIY WordPress build for a small business site runs about 40 to 80 hours of focused work across the twelve steps. Domain and DNS runs 30 minutes. Hosting setup runs 1 to 2 hours. WordPress core install runs under an hour. Theme selection is 2 to 6 hours of research. Plugin baseline and configuration takes 3 to 5 hours. Custom block or template work runs 10 to 30 hours depending on skill. Content input runs 8 to 20 hours depending on page count. SEO baseline takes 3 to 6 hours. QA and launch checklist runs another 6 to 10 hours. Budget it. Do not underestimate the content step.
Skill prerequisites before you start
You need three baseline skills to develop a website in WordPress on your own. Basic HTML and CSS for editing the theme when you inevitably need to. Comfort in the WordPress admin, or 4 hours of tutorial time to reach comfort. A working understanding of DNS records so you can point the domain at the host without a support call. If any of those three is missing, budget an extra 20 hours for the learning curve or hire a WordPress developer at $75 to $150 per hour for the technical steps. Neither approach is wrong. Both are honest about the skill gap.
Domain, DNS, and hosting for the WordPress website development tutorial baseline
Domain, DNS, and hosting are steps one and two in any real WordPress website development tutorial. Buy the domain at Namecheap, Porkbun, or Cloudflare Registrar. Skip GoDaddy because their support is upsell-heavy. Buy the domain for two years minimum, turn on WHOIS privacy, and set a calendar reminder for renewal 60 days before expiry.
Managed WordPress hosting matters more than the domain choice. Kinsta, WP Engine, Cloudways, and SiteGround are the four hosts most WordPress developers pick in 2026. Kinsta at $35 to $115 per month is the professional pick for sites over 20,000 monthly visitors. Cloudways at $14 to $80 per month is the value pick for sites under 20,000 visitors. WP Engine at $30 to $115 per month sits in between. SiteGround at $6 to $35 per month is the entry pick for personal sites and micro-businesses. Do not use big-box shared hosting. Your mobile page speed will thank you. See Kinsta on hosting comparisons for the honest tradeoffs.
DNS setup mistakes to avoid
Point your domain at Cloudflare for DNS management rather than leaving it at the registrar. Cloudflare’s DNS lookups are 30 percent faster than most registrar DNS, and their free plan includes a CDN, DDoS protection, and analytics. Set A records for the root domain and the www subdomain both pointing at the host IP. Add MX records if you run email on Google Workspace or Microsoft 365. Turn on Cloudflare’s SSL to full-strict once the host has installed the origin certificate. Skip these DNS basics and the site will work fine on desktop but throw certificate errors on some mobile browsers.
Staging environment on day one
Managed WordPress hosts give you a one-click staging environment. Turn it on before you install a single plugin on production. Every plugin update, theme change, or content bulk import runs on staging first, then to production after a smoke test. That single habit prevents 80 percent of the site-broken emergencies that DIY WordPress developers land in. Sites without staging break during routine updates and stay broken until the developer clears the afternoon to debug. Sites with staging catch the break on staging and never affect the live site at all. The habit is free and it is worth its weight in gold.
Theme picks when developing a website using WordPress
Developing a website using WordPress in 2026 means picking one of three theme paths. Path one is a lightweight starter theme like GeneratePress or Kadence with custom CSS. Path two is a block theme like Twenty Twenty-Four or Astra with full site editing. Path three is a custom theme built on Underscores or Sage 10 from scratch. Each path fits a different budget and skill level. Path one is $79 and a weekend. Path two is $59 and a week. Path three is $4,000 to $18,000 of developer time. Match the path to what you are actually building.
Skip the multipurpose themes with 40 pre-built demo layouts. Divi, Avada, and BeTheme all fall in this category. They look easy on day one and cost you every day after because the theme ships 800 kilobytes of CSS and JavaScript your site does not use, tanking your mobile page speed and locking your content into proprietary blocks that will not migrate to a different theme in year three. Ask the tutorial that recommended a multipurpose theme when they last built a site on it. If it was 2020, that recommendation is stale.
| Theme path | Cost | Time | Best for |
|---|---|---|---|
| Lightweight starter (GeneratePress, Kadence) | $79 to $199 | 1 to 2 weeks | Small business, personal, portfolio |
| Block theme + FSE (Twenty Twenty-Four, Astra) | Free to $59 | 1 week | Content-first, blog-heavy |
| Custom theme (Underscores, Sage 10) | $4,000 to $18,000 | 6 to 12 weeks | Business site, custom UX, brand |
GeneratePress workflow in detail
GeneratePress Premium at $59 per year is the pick most DIY WordPress developers should default to for a small business site. Install the theme, install the GenerateBlocks plugin, and you have a full block editor with layout containers, buttons, headings, and columns without pulling in any of the bloat that comes with page builders. The theme adds less than 10 KB of CSS to your pages. Your mobile page speed stays green. The learning curve is 3 to 4 hours of following the official documentation. That combination of speed, price, and simplicity is why GeneratePress is the pick for a real DIY WordPress build.
Astra with starter templates
Astra with starter templates is the pick when you want to develop a website in WordPress without doing your own design work. The Astra template library ships 200+ pre-built site designs across restaurant, agency, ecommerce, and portfolio verticals. Pick a template close to your business, import it in one click, swap the copy and imagery, and you have a launchable site in a week. The tradeoff is that hundreds of other sites will use the same template. Your site will not feel bespoke. That is fine for a small business where getting live matters more than looking unique.
If your quote includes 'Divi', 'Avada' or 'Elementor Pro', budget a full rebuild in year 2. A stripped block theme costs the same and stays portable.
Plugin baseline for how to develop website in WordPress
Plugin choices are step five in the how to develop website in WordPress workflow. Install the minimum required to make the site work, not the maximum you might use someday. A healthy business site runs 8 to 15 active plugins. A bloated site runs 30 to 60 plugins and pays for it on every page load. Every plugin adds database queries, PHP execution time, and a potential security vulnerability. Ruthlessly delete anything you are not actively using. That discipline pays back on both speed and security every single day the site is live.
- RankMath or Yoast for SEO and schema markup
- WP Rocket or hosting-provided cache for page caching
- Wordfence Security or Sucuri for firewall and malware scanning
- UpdraftPlus or hosting-provided backups for automated backups
- Gravity Forms or Formidable Forms for contact forms with real conditional logic
- Advanced Custom Fields Pro for custom fields on posts and pages
- Redirection for 301 redirects when you change URL structures
- Query Monitor for debugging performance and query issues on staging
RankMath vs Yoast in 2026
RankMath and Yoast both handle title tags, meta descriptions, XML sitemaps, and schema markup. RankMath ships more features in the free tier including schema types for FAQ, HowTo, and LocalBusiness. Yoast has stronger content analysis and a longer track record. Pick RankMath if you want the free schema markup out of the box. Pick Yoast if you value the readability suggestions. Both work. Neither one will make your content rank if the content is thin. See Ahrefs on WordPress SEO for a deeper comparison.
Caching plugin choice
WP Rocket at $59 per year is the paid pick that ships zero configuration required. Install, activate, and your page speed jumps 20 to 40 percent on the median page. The alternatives are W3 Total Cache and WP Super Cache, both free but requiring hours of configuration to reach the same speed. Managed WordPress hosts often ship their own cache layer, which is usually enough on its own and makes third-party caching plugins redundant. Ask your host before installing a caching plugin. Double-caching causes weird bugs that are hard to debug in the middle of a launch week.
Custom blocks and page templates in the WordPress website development course path
Steps six and seven in the WordPress website development course path are custom blocks and page templates. Every business site needs at least a hero block, a features block, a testimonial block, a call-to-action block, and a service card block. Native Gutenberg ships basic versions of most of these. GenerateBlocks or Kadence Blocks extends them with layout options and design controls. Advanced Custom Fields Pro Blocks lets you build fully custom blocks tied to your specific design system without writing React from scratch.
The right pattern is to build blocks that constrain what the editor can do. A hero block should expose fields for headline, subhead, CTA text, CTA URL, and background image. Nothing else. The editor cannot accidentally add a rogue paragraph in the middle of the hero. That constraint keeps the design intact through 200 edits over the life of the site. Page builders let editors do whatever they want, which sounds like freedom until month six when the homepage has 12 competing styles and nobody remembers why. Constrained blocks beat freeform builders every time on a business site.
Page templates for common patterns
Build three page templates minimum for a small business WordPress site. A homepage template with hero, features, testimonials, and CTA. A service page template with hero, description, features, pricing, testimonials, and CTA. A blog post template with title, meta, featured image, body, author bio, and related posts. Save each as a template in the block editor. Every new page starts from a template instead of a blank editor. That standardization keeps the site consistent and cuts editing time for the marketing team by roughly half.
Reusable patterns for common sections
WordPress reusable patterns let you save block combinations for reuse across pages. A pricing table pattern used on five service pages should be a reusable pattern, not five separate copies. Update the pattern once and every instance updates. That single feature saves marketing teams hours of manual sync work every quarter. Every real WordPress site should have 5 to 15 reusable patterns for CTAs, testimonial rows, feature grids, and pricing tables. Sites without reusable patterns become inconsistent as different editors copy-paste slightly different versions of the same section.
Content input step in learn WordPress website development
Content input is step eight, and it is the step every business owner underestimates when they learn WordPress website development. A ten-page small business site needs 5,000 to 12,000 words of copy across the homepage, service pages, about page, contact page, and initial blog posts. Writing that copy from scratch takes 20 to 40 hours if you are a comfortable writer. Hiring a writer costs $600 to $4,500 depending on quality. Do not skip this step. A pretty design with placeholder copy earns nothing. Real copy is where the ranking and conversion actually live.
Write the copy before you touch the design. Copy shapes the design, not the other way around. Every section on the homepage should exist because the copy needed it. A features section exists because you have four features worth showing. A testimonial section exists because you have three testimonials worth quoting. A hero section exists because you have one headline and one call to action that convert. Sites designed before the copy is written end up with sections built around lorem ipsum that never gets replaced because there is nothing meaningful to say there.
Copy first, design second
The workflow is write the copy in Google Docs. Get it approved by whoever needs to approve it. Then paste it into the WordPress editor and design the sections around what the copy needs. That order saves you 40 percent of the design and revision cycles. Sites designed around lorem ipsum need to be redesigned once the real copy arrives because the real copy is always shorter or longer or differently shaped than the designer assumed. Real copy first, design second. That single rule cuts the timeline by two weeks on almost every project.
Image optimization and file sizes
Every image on your WordPress site should be optimized to WebP format and under 200 KB, ideally under 100 KB for hero images. Use Squoosh, TinyPNG, or the ShortPixel WordPress plugin to compress images before upload. Set width and height attributes on every image to prevent cumulative layout shift. Enable native lazy loading on all below-fold images. Use fetchpriority high on the hero image only. These four rules alone push most WordPress sites from a mobile page speed of 55 up to 85 or higher.
Case study on developing a WordPress website for a real client
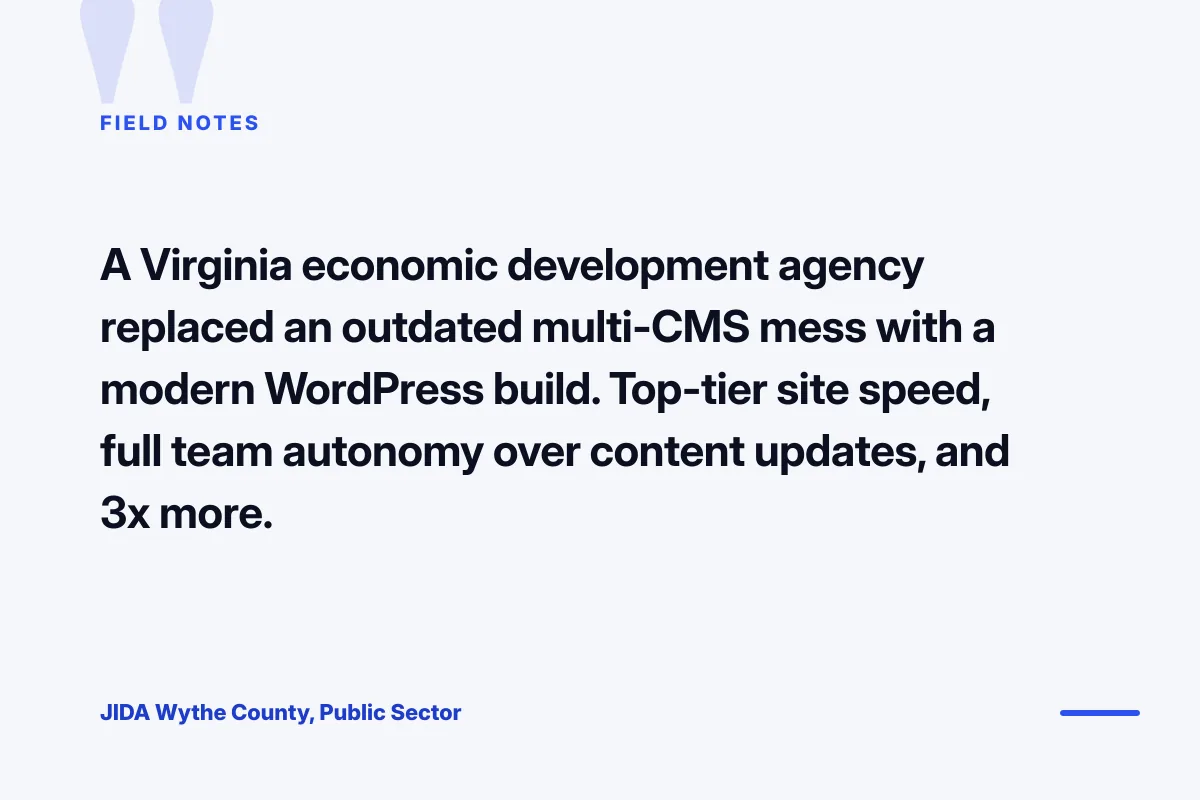
The Joint Industrial Development Authority of Wythe County, a Virginia economic development agency, came to us with an outdated multi-CMS mess. Their old build had a WordPress front end, a Drupal press release archive, and a static HTML brochure section, all stitched together with iframes and manual FTP updates. Every content update required a call to the previous vendor because nobody on the JIDA team could log in to three different CMSes and remember which section lived where. Mobile page speed was in the red. Session length was under a minute. The team was ready for a real rebuild.
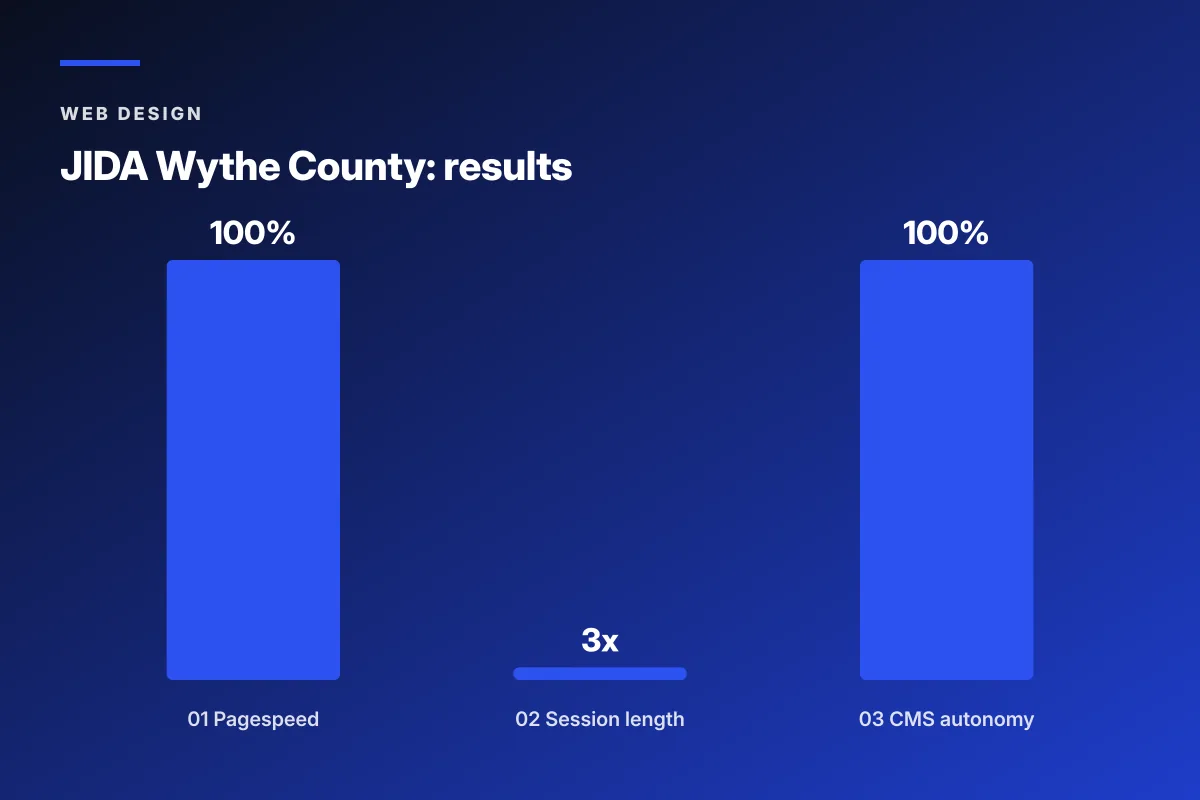
We ran a full WordPress rebuild consolidating the three CMSes into a single WordPress install with custom post types for press releases, projects, and board minutes. The block editor gave the JIDA team full editorial control without touching HTML. Mobile page speed hit the 80th percentile and desktop hit 100. Session length tripled because visitors could actually navigate the site. CMS autonomy went from zero to complete. Every one of those results came from a WordPress build scoped for the actual workflow the team runs, not for the fancy features the previous vendor thought sounded impressive.
The outcome measured at launch
100 percent uptime on the new host across the first three months. 100th percentile PageSpeed on desktop, 80th on mobile. 3x increase in session length as visitors navigated a coherent site instead of iframe-stitched fragments. 100 percent CMS autonomy for the JIDA team, no vendor dependency for content updates. Every metric came from consolidating three CMSes into one WordPress install with custom post types matching the actual workflow. The previous vendor had shipped complexity for the sake of complexity. The rebuild shipped simplicity that matched the team’s actual needs.
Lessons for your own WordPress build
Two lessons from the JIDA rebuild carry into any WordPress build. First, consolidation beats fragmentation almost every time. Three CMSes running together is 4x more expensive to maintain than one CMS doing the same work. If your current site runs multiple platforms, the rebuild should consolidate to one. Second, editorial autonomy is a business outcome, not a technical detail. A team that cannot update their own site burns 3 to 8 hours per week on vendor coordination for content changes. That coordination overhead is the hidden cost of a poorly scoped WordPress build.
SEO baseline in a WordPress website development tutorial
SEO baseline is step nine in any real WordPress website development tutorial. Configure RankMath or Yoast on install day. Set title tags and meta descriptions for every page, not just defaults. Submit the XML sitemap to Google Search Console and Bing Webmaster Tools. Install schema markup for Organization on the homepage, Article on every blog post, LocalBusiness on single-location sites, and Service on service pages. Set canonical URLs. Redirect all HTTP traffic to HTTPS. Redirect www to non-www or the reverse based on your preference. These are the baseline. Anything less is unfinished.
Internal linking is where the SEO baseline actually earns rankings. Link the homepage to the top three service pages. Link every blog post to two related blog posts and one service page. Link every service page back to the homepage. Build silos where a pillar page links down to five cluster posts and each cluster post links back up. That graph of internal links is what tells Google the site has topical authority. A site with 40 pages and no internal linking is 40 orphaned islands, and Google ranks orphaned islands at position 40 on page four. See Google Search Central on SEO fundamentals for the authoritative reference.
Google Search Console setup on launch
Set up Google Search Console the day the site goes live. Verify the domain using DNS record verification, not the HTML file method, because DNS verification covers all subdomains and stays permanent. Submit the XML sitemap RankMath or Yoast generates. Check the Coverage report weekly for the first month to catch any indexation issues. Search Console will show you what queries the site actually ranks for, what pages get impressions, and what technical issues Google encounters. That data is more valuable than any keyword research tool because it is your data on your site.
Schema markup baseline
Schema markup helps Google and every large language model understand what each page is about. Configure Organization schema on the homepage with your business name, logo, and social profile URLs. Add LocalBusiness schema if you serve a specific geography. Add Article schema on every blog post with author, dates, and image. Add FAQPage schema on pages with real question and answer content. Add Service schema on service pages with the service name and description. RankMath handles most of the configuration if you fill in the settings. Sites without schema markup rank fine but leave AI Overview and rich result opportunities on the table.
The classic DIY WordPress launch goes like this. You spend three weekends building the site. You are proud. You show it to your spouse who says it looks nice. You send the link to two friends who never open it. You post it on LinkedIn where six people react. You check Google Analytics obsessively for two weeks. You have twelve visitors. Ten of them are you. Two are bots. This is normal. The site does not fail. You just have not told the internet it exists yet. That is a marketing job, not a development job.
Pre-launch checklist in how to develop wordpress website end to end
The pre-launch checklist is step ten in how to develop a WordPress website. Run every item before you switch DNS to production. Every item you skip becomes a support ticket in week two. The checklist takes 4 to 6 hours to run properly on a small business site. That is time well spent. Sites that launch without a checklist ship broken forms, missing SSL certificates, unindexed pages, and 404s on internal links. All of it is preventable with the checklist.
- SSL certificate installed and forcing HTTPS on all pages
- XML sitemap submitted to Google Search Console and Bing
- Robots.txt allowing indexing (WordPress default is No when in development mode)
- Every internal link tested for 404s using Broken Link Checker or Screaming Frog
- Every contact form tested end to end including email delivery to inbox
- Google Analytics 4 installed with conversion events firing on form submits
- Mobile page speed tested on real device, not just PageSpeed Insights
- Accessibility scan run with WAVE or axe DevTools with issues resolved
Form testing end to end
Every contact form on the site should be tested end to end before launch. Submit a test entry. Check that the confirmation email arrives in the recipient inbox. Check the spam folder. Check on both desktop and mobile browsers. Check with a real name in the from field, not a test string. Forms that fail to deliver silently are the most expensive bug in WordPress. You lose leads and never know why for weeks. A three-minute test on launch day prevents six months of quiet lead loss. Do it. Do it every time you make a change to the form or the SMTP settings.
Accessibility scan and fixes
Run WAVE or axe DevTools on every template on the site. Fix every error and warning. Contrast ratios below 4.5:1 need color adjustments. Missing alt text needs writing. Missing form labels need adding. Keyboard navigation should reach every interactive element. Screen reader testing should hit at least three pages. Accessibility is not optional. It is a legal requirement under ADA in the US, and it correlates strongly with SEO because both reward clean semantic HTML. A site that passes accessibility scans usually also passes Google’s technical SEO checks with minimal extra work.
Post-launch monitoring in the how to develop wordpress website workflow
Steps eleven and twelve in how to develop wordpress website builds are launch day and post-launch monitoring. Launch day is DNS switch, cache flush, and 24 hours of watching Search Console for indexation. Post-launch monitoring runs weekly for the first month, then monthly forever. What you monitor: uptime, page speed, Search Console indexation, form submissions, Google Analytics conversion events, and any 404s in the server log. Ignore any of these and you will not know when the site breaks until a customer emails you.
Set up uptime monitoring with UptimeRobot at $0 for basic or $8 per month for the paid plan. Set up Google Search Console email alerts for any indexation errors. Configure Google Analytics 4 with conversion events on form submits, phone clicks, and any e-commerce events. Review Analytics weekly for the first month, monthly thereafter. Sites without post-launch monitoring silently degrade over 6 to 18 months as content ages, plugins go stale, and competitors ship better pages. Sites with monitoring catch the drift in month two and correct it. Our website maintenance packages covers the monitoring scope at $199 and up per month.
Weekly review cadence for the first month
Block a 30-minute review every Monday for the first four weeks after launch. Check uptime for the past seven days. Check Google Search Console for indexation errors or crawl issues. Check Google Analytics for the top ten landing pages and any pages with zero traffic. Check the contact form submissions for spam patterns that suggest you need honeypot or reCAPTCHA. That review catches almost every launch-week bug before it becomes a lead-loss problem. Skip the weekly review and you find out about broken forms three months later when a customer emails to ask why nobody responded to their inquiry from July.
Where to start with your own WordPress build
How to develop wordpress website builds starts with buying the domain and hosting today, before you finish reading this guide. That single commitment turns the project from a research phase into a real timeline. Everything else is process. Follow the twelve steps in order. Do not skip the copy step. Do not skip the pre-launch checklist. Do not skip the post-launch monitoring. Every skipped step becomes a support ticket or a lost lead in month three. The process is boring on purpose. Boring is what ships on time.
Ready to hand the twelve steps to a team that has done them a few hundred times, our WordPress Website Development Services covers the full engagement. For the bespoke design conversation, see custom WordPress website development. For the pricing detail, see WordPress website development cost. For the ecommerce version see WordPress ecommerce website development. For the block editor reference, see the WordPress Block Editor handbook.
Frequently asked questions
How to develop a WordPress website from scratch in 2026?
How to develop a WordPress website from scratch in 2026 breaks into twelve real steps. Buy the domain and set DNS at Cloudflare. Pick managed WordPress hosting like Kinsta or Cloudways. Install WordPress core and turn on staging. Pick a lightweight starter theme like GeneratePress or Kadence. Install 8 to 15 baseline plugins covering SEO, caching, security, backups, and forms. Build custom blocks or use GenerateBlocks for layout control. Write the copy in Google Docs before you touch the design. Configure RankMath or Yoast for SEO baseline including title tags, meta descriptions, and schema markup. Optimize images to WebP under 100 KB. Run pre-launch QA covering SSL, forms, page speed, and accessibility. Switch DNS to production. Monitor Search Console, uptime, and analytics weekly for the first month.
How to develop website in WordPress without coding skills?
How to develop website in WordPress without coding skills works when you pick the right theme and stay inside the block editor. Install GeneratePress Premium at $59 per year and the GenerateBlocks plugin. Both give you a full block editor with layout containers, headings, buttons, and columns without writing any code. Astra with starter templates ships 200+ pre-built site designs you can import in one click and swap the copy on. Neither path requires HTML or CSS knowledge. You will still need to write clean copy, optimize images to WebP under 100 KB, configure RankMath for SEO, and run the pre-launch checklist. Budget 40 to 80 hours across four to eight weeks. That commitment gets you a launchable business site without a developer.
How to develop a website using WordPress with WooCommerce?
How to develop a website using WordPress with WooCommerce adds three steps to the standard twelve-step workflow. First, install WooCommerce and configure payment processing through Stripe or PayPal. Second, add tax and shipping logic through built-in settings or TaxJar integration. Third, install premium WooCommerce extensions matching your business model. WooCommerce Subscriptions for recurring billing, Table Rate Shipping for real-world shipping rules, WooCommerce Bookings if you sell time slots. Ecommerce hosting requires more resources, run $50 to $250 per month on a small store, $500 to $2,500 per month on mid-market. Test the checkout end to end before launch on both desktop and mobile. Test failure paths like declined cards. Set up abandoned cart recovery.
How to develop a website on WordPress and rank on Google?
How to develop a website on WordPress and rank on Google requires an SEO baseline built into the site at launch. Configure title tags and meta descriptions for every page through RankMath or Yoast. Submit the XML sitemap to Google Search Console. Install Organization schema on the homepage, Article schema on blog posts, LocalBusiness schema for single-location businesses, Service schema on service pages. Build internal linking silos where a pillar page links down to five cluster posts and each cluster post links back up. Optimize every image to WebP under 100 KB. Hit a mobile page speed of 85 or higher. Write real 2000 to 3500 word content on target keywords. Ranking takes 3 to 9 months of consistent publishing and internal linking, not one launch weekend.
How to develop a WordPress website timeline and hours?
A DIY WordPress build for a small business site runs 40 to 80 hours of focused work across four to eight weeks. Domain and DNS takes 30 minutes. Hosting setup takes 1 to 2 hours. WordPress core install takes under an hour. Theme selection is 2 to 6 hours of research. Plugin baseline and configuration takes 3 to 5 hours. Custom block or template work runs 10 to 30 hours depending on your skill level. Content input runs 8 to 20 hours depending on page count. SEO baseline configuration takes 3 to 6 hours. QA and launch checklist runs another 6 to 10 hours. Hiring a WordPress developer at $75 to $150 per hour compresses the timeline to 4 to 8 weeks calendar time and 40 to 80 developer hours.
How do I develop a wordpress website that stays fast on mobile?
Developing a wordpress website that stays fast on mobile requires four disciplines. Pick a lightweight theme that ships under 15 KB of CSS. GeneratePress and Kadence hit that bar. Avoid multipurpose themes like Divi, Avada, or BeTheme that ship 400 to 800 KB of CSS you never use. Install a real caching plugin like WP Rocket or use the caching layer built into managed WordPress hosting. Optimize every image to WebP format under 100 KB with width and height attributes set. Skip page builders like Elementor and Divi Builder. They add 200 to 400 KB of JavaScript per page. Use native Gutenberg blocks plus GenerateBlocks or Kadence Blocks instead. Those four disciplines take a WordPress site from mobile page speed 40 up to 85 or higher without any code changes.
What is the best WordPress website development tutorial to learn from?
The best WordPress website development tutorial paths in 2026 combine official documentation with one paid course and one live project. Start with the official WordPress.org Get Started guide for the platform basics. Follow the Kinsta blog for hosting-agnostic technical tutorials. For structured learning, WPBeginner and Learn WordPress from the official WordPress project are free and current. For paid depth, WPCasts and WP101 both run around $99 per year and cover the block editor plus custom development. Skip Udemy WordPress courses because most are three years out of date and still teach Elementor as the default. The best learning is building one real site end to end while following the twelve-step process, not consuming 40 hours of video passively.
Book your free 30-minute strategy call.
No spam, no sales rep. We use your email to schedule your call with a senior strategist. That is it.
More from the blog
View all articles → Web Design
 Core Web Vitals Healthcare Websites Actually Need to Book Patients
Read article Web Design
 Professional Services Website Design Best Practices for 2026
Read article Web Design